my exams are officially over! in celebration, i have written a pattern to share with you!
i don’t know if it’s just me, because i’m a scorpio and thus an inherently sneaky person, or if everyone’s a bit like this, but i love to have little stashes of secrets. since i was small i’ve been fascinated by lockable diaries, hollow books, treasure boxes, and other repositories for private and precious things. that’s why i designed and made this little bag. i’m not going to tell you what’s in it, but i will tell you how to make it!
the pattern is completely flexible as far as size goes – you can make it as big or as small as you like. as such, i can’t tell you exactly how much fabric you will need because that will depend, but my bag is smallish, so two fat quarters were more than enough.
you will need:
- two pieces of complimentary fabric. one will be the outside of your bag (fabric A), and the other will be the lining and the ribbon/cord casing (fabric B).
- matching thread
- a plate (or other round object) that has the same circumference as you would like the base of your bag to have.
- two lengths of ribbon or cord for draw strings.
- sewing machine, scissors, pins, fabric pen, and some sort of measuring tool (tape measure, ruler or similar).
cutting:
1. place your plate on your piece of fabric B, and trace around it carefully with your fabric pen.
2. roughly cut a square from this fabric that contains the circle you just drew, then cut a piece of fabric A the same size and pin them together.
3. carefully cut around your traced line so that you end up with two circles that are exactly the same size, one from each of your two fabrics.
4. take a piece of thread or string, and lay it exactly around the edge of one of your circles. measure the length of the string, and this will give you the circumference of your circle. if you add ½“ to this (for seam allowance), you will have the length of fabric you need to create the body of your bag. the height is up to you, and will depend on the proportions you would prefer – just remember that you will lose ¼” in seam allowance at both the top and the bottom, so factor that in before you cut. whatever size you chose, you should cut two pieces of fabric to those dimensions – one of fabric A and one of fabric B.
5. cut fabric for the casings for your draw-strings. these will consist of two pieces of fabric B, each 2” by 1/3 of the total length of your bag body.
making and attaching the casings:
1. fold one piece of your casing fabric in half (right sides of fabric together, wrong side facing out) so that the long edges meet. lightly press, and then sew just under half way down the length of the edge, leave a 1” gap for turning and continue sewing to the end. leave the short ends open!
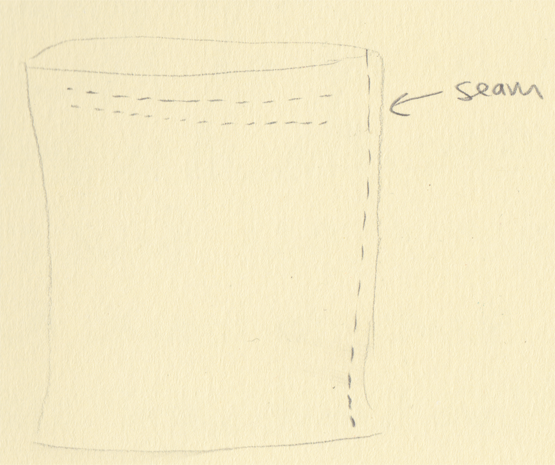
2. hold your piece of casing upright to that he pressed seam is on your ironing board, and the sewn seam is pointing up up. press down so that the sides bulge out and then little tube goes flat. the sewn seam is now lying in the middle of the flattened tube. press, then sew the short ends closed. these little seams should form a t-intersection with the long seam you sewed earlier. See diagram below for clarification (it’s a simple process that is surprisingly difficult to explain!).
3. carefully trim the corners, turn right side out, press, then slip stitch your turning hole closed (you don’t need to be super-neat or especially careful about this, as the seam will not be visible once your bag is constructed.
4. repeat the previous three steps for second piece of casing.
5. take the piece of fabric A that you have cut to the appropriate size for the body of your bag. fold this in half, with the right side of the fabric facing out. lay one of your casings on top of this piece, the long seam facing down, 1½” from the top of the fabric. center it lengthways, then pin it to the top layer of the folded fabric (do not pin through both layers of the folded fabric). do the same on the other side of the fabric with your other casing.
6. sew the casings on with seams a scant 1/8” from the top and bottom edge. reinforce the edges by doing a little back-and-forth sewing at each end of each seam, because they get pulled on a lot as you open and close your bag, and need to be secure. leave the short ends open (you will thread your drawstrings though them later).
assembling the bag:
1. take your body piece of fabric B, and turn it into a tube by folding it in half, right sides together, and sewing a seam down the edge that is not equal to the circumference of your circle. press the seam.
2. with the right side of your circle facing up, and your tube-like body piece of fabric still inside out, pin the circle to the bottom edge of the tube you’ve just created. sew this on with a ¼” seam, then turn it right-side-out. this is now the lining of your bag.
3. go through the previous two steps with your circle and body pieces of fabric A to create the outside of your bag, only leave this one inside out.
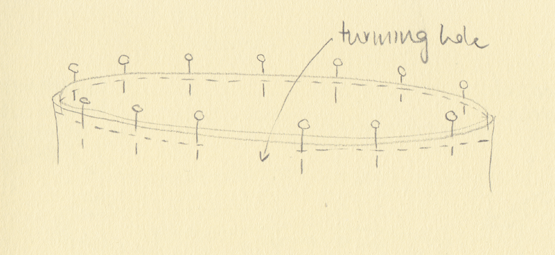
4. place your right-side-out lining inside your inside-out outer bag, lining up the two side seams neatly. pin around the top, then sew it up with a ¼” seam, leaving a 1” hole for turning.
5. turn your bag right-side-in through the turning hole, press the top seam carefully, then top stitch around the top seam, being careful to catch the folds of your turning hole so that it closes neatly.
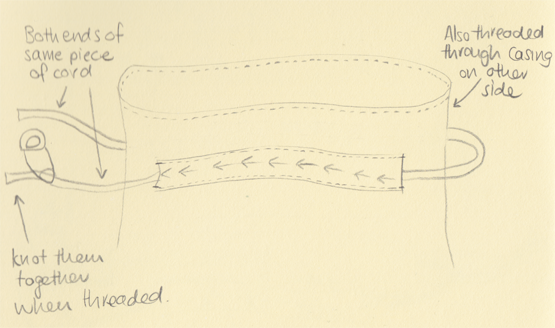
6. using a safety pin or similar, thread your ribbon or cord through the casings. thread one piece through each casing so that it loops around the bag with several inches to spare at each end, then tie the ends in a knot.
7. thread the other piece through in the same way, only in the opposite direction. When you pull on the knotted ends, the bag should draw closed.
now all that remains is to fill your bag with secret treasures and find a good hidey-hole for it! i hope you love this pattern, and that you’ll leave a comment, or drop back with photos if you make it.


