Showing posts with label fabric. Show all posts

Thursday, 12 July 2012

tutorial: scrappy wall quilt


some months ago, i participated in a scrap swap with some lovely crafty people on instagram. i received some beautiful little pieces of fabric, that might otherwise have ended up unused, and decided to team them with bits from my own vast scrap collection to make a wall quilt for our bedroom.
it's a pretty straightforward project, so i thought i'd share a quick tutorial here...


scrappy wall quilt

what you'll need

81 white or cream fabric scraps, cut into 1.5 inch squares
402 coloured fabric scraps, cut into 1.5 inch squares
30 x 30 inch piece of backing fabric
30 x 30 inch piece of quilt batting (i used an offcut from another quilting project)
1 skein of cream coloured stranded embroidery floss
1.2m bias binding in a colour or print that complements your scrap collection
sharp scissors
a sewing machine with bobbin and cotton (i aways use gutermann thread, and find cream is the best colour for scrappy projects)
quilting safety pins
a quilting or embroidery needle


what to do

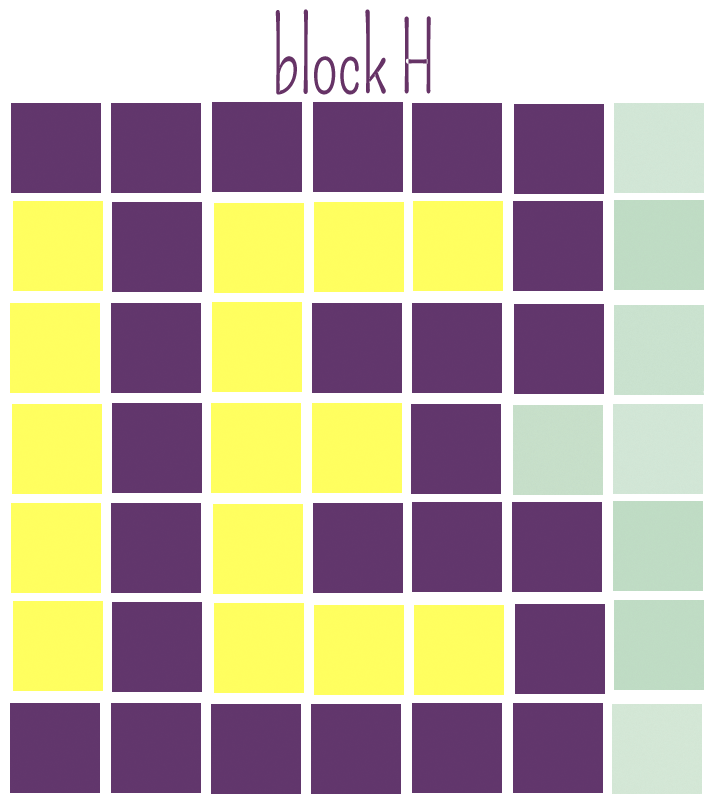
  • using your sewing machine, and working with 1/4 inch seams, piece your blocks according to the diagrams below:



  • sew blocks into rows as shown in the following diagram, then sew the rows together to complete your quilt top


  • lay your backing fabric right side down on a flat surface (the floor, or kitchen bench is ideal), smoothing it out so that it is perfectly flat
  • place your quilt batting on top, smoothing again as you go
  • finally, place your pieced quilt top, right side up, on the batting.
  • working from the middle towards the edges, carefully pin these three layers together with your quilting safety pins (i usually put roughly one pin per 3 inches square. you can't really over-pin, so if in doubt, err on the side of caution.)
  • thread your needle with two strands of floss, and stitch a small X at the point of each square on your quilt as pictured below. 
top: begin to make your X, leaving a 1 inch tail at the back for tying off
bottom: complete your X, and tie off at the back with a strong double knot. then trim the ends to approx 1/4 inch long

  • remove saftey pins as each section is quilted.
  • using a very sharp pair of scissors, trim the backing and batting of your quilt so they are even with the edge of the top
  • now bind your quilt using your preferred method (if you have not bound a quilt before, this tutorial is a good one to start with, otherwise have a look for on youtube where there are heaps of good demonstrations to be found).
  • your quilt is now complete, and ready to hang.

further notes
  1. where scrap size permitted, i tried to "fussy cut" my fabric squares, to pick out interesting or pretty motifs such as the fern, horse, and squirrel below.
  2. the reason i chose this, frankly MUCH more time consuming method of quilting, is because of the very small pieces of fabric. quilting over the individual squares would have obscured all the tiny details to be found in the prints, which to my mind would have defeated the purpose of the quilt. 
  3. if you'd like to see what other people have made with their scraps, have a look at the #inchbyinchquilt hashtag on instagram - there are some beauties there!

i hope you have a go at this project. it's lovely to revisit old favourite fabrics, and work with them all over again, and the finished piece looks very cosy and, well... homey on the wall.

do drop me a comment or an email if you make your own - i'd very much love to see it!

Monday, 8 February 2010

a quilt for sara-jane

my sajee finally has her own quilt, and she has our friend lilito thank for it. lili posted a photo of a cushion she was making using string blocks, and i thought it looked kind of great, so i had a go at it myself. it got kind of addictive, and this was the result:


i used heaps of scraps, and some carefully selected fat quarters, and i think it came together pretty well:


the backing is quite simple, to contrast with the super busy top


and the blue contrasts nicely with the oranges and yellows


but most importantly, it gets the tiny dog’s tick of approval:

p.s. if you want to have a try at a string quilt yourself, here are a couple of tutorials:

Wednesday, 18 November 2009

a variation

it’s your mum’s job to love all the little things you make. mine has unfailingly encouraged my creativity, and has aided and abetted me in any way i’ve asked, from letting me hammer old nails into bits of wood as i imagined engineering some personal robot companion, to lending me bowls from the kitchen in which to concoct brews from berries, leaves, pollen, and mud from the garden, to good old fashioned cutting, pasting and drawing.

i’m left-handed, so she’s always found the way i go about things a bit puzzling (“but that’s backwards”), and teaching me to knit proved to be quite a challenge, but i know she’s proud of what i make because her house is full of framed embroideries and drawings i’ve done for her, and she has a box of childhood creations that she’s put somewhere safe in case of fire.

even though i know all this, i was still very proud when she asked me to make some christmas presents for her friends this year. she ordered some coasters.
here’s the first set:


i’m following the same steps that i outlined in the ‘coasters in an hour’, pattern that i wrote and posted a while ago, with a couple of tiny variations:

instead of cutting the same size squares of fabric A and fabric B, one is designated as backing (let’s say that’s fabric A), and then two fabrics are chosen as the top (they’ll, perhaps predictably, be B & C). 
as you can see above, i’ve chosen a kind of ‘feature fabric’ as fabric B, and a few different complimentary fabrics, which for the purposes of simplification i will refer to collectively as fabric C.
i wanted to make these ones a teensy shade bigger than the original pattern, so i cut four squares of fabric A at 4″ instead of 3.75″. then i cut four rectangles of fabric B at 4×3″, and four from fabric(s) C at 4×1.5″.
i paired each piece of fabric B with a piece of fabric C, and sewed them into squares along the 4” edge, using, as always, a ¼” seam.
the rest of the process was the same as in the original pattern.


i like the way this variation not only lets you use a bigger range fabrics, but also lets you use some fabric that you may only have tiny pieces of left. i tend to cling to skerricks of fabrics that i have loved (as many quilters do!), and i’m always thrilled to be able to use them up on things that i know will be used and hopefully loved.

Friday, 13 November 2009

tutorial: little bag of secrets

my exams are officially over! in celebration, i have written a pattern to share with you!


i don’t know if it’s just me, because i’m a scorpio and thus an inherently sneaky person, or if everyone’s a bit like this, but i love to have little stashes of secrets. since i was small i’ve been fascinated by lockable diaries, hollow books, treasure boxes, and other repositories for private and precious things. that’s why i designed and made this little bag. i’m not going to tell you what’s in it, but i will tell you how to make it!
the pattern is completely flexible as far as size goes – you can make it as big or as small as you like. as such, i can’t tell you exactly how much fabric you will need because that will depend, but my bag is smallish, so two fat quarters were more than enough.

you will need:

- two pieces of complimentary fabric. one will be the outside of your bag (fabric A), and the other will be the lining and the ribbon/cord casing (fabric B).
- matching thread
- a plate (or other round object) that has the same circumference as you would like the base of your bag to have.
- two lengths of ribbon or cord for draw strings.
- sewing machine, scissors, pins, fabric pen, and some sort of measuring tool (tape measure, ruler or similar).


cutting:
1. place your plate on your piece of fabric B, and trace around it carefully with your fabric pen.
2. roughly cut a square from this fabric that contains the circle you just drew, then cut a piece of fabric A the same size and pin them together.
3. carefully cut around your traced line so that you end up with two circles that are exactly the same size, one from each of your two fabrics.
4. take a piece of thread or string, and lay it exactly around the edge of one of your circles. measure the length of the string, and this will give you the circumference of your circle. if you add ½“ to this (for seam allowance), you will have the length of fabric you need to create the body of your bag. the height is up to you, and will depend on the proportions you would prefer – just remember that you will lose ¼” in seam allowance at both the top and the bottom, so factor that in before you cut. whatever size you chose, you should cut two pieces of fabric to those dimensions – one of fabric A and one of fabric B.
5. cut fabric for the casings for your draw-strings. these will consist of two pieces of fabric B, each 2” by 1/3 of the total length of your bag body.


making and attaching the casings:
1. fold one piece of your casing fabric in half (right sides of fabric together, wrong side facing out) so that the long edges meet. lightly press, and then sew just under half way down the length of the edge, leave a 1” gap for turning and continue sewing to the end. leave the short ends open!
2. hold your piece of casing upright to that he pressed seam is on your ironing board, and the sewn seam is pointing up up. press down so that the sides bulge out and then little tube goes flat. the sewn seam is now lying in the middle of the flattened tube. press, then sew the short ends closed. these little seams should form a t-intersection with the long seam you sewed earlier. See diagram below for clarification (it’s a simple process that is surprisingly difficult to explain!).


3. carefully trim the corners, turn right side out, press, then slip stitch your turning hole closed (you don’t need to be super-neat or especially careful about this, as the seam will not be visible once your bag is constructed.
4. repeat the previous three steps for second piece of casing.
5. take the piece of fabric A that you have cut to the appropriate size for the body of your bag. fold this in half, with the right side of the fabric facing out. lay one of your casings on top of this piece, the long seam facing down, 1½” from the top of the fabric. center it lengthways, then pin it to the top layer of the folded fabric (do not pin through both layers of the folded fabric). do the same on the other side of the fabric with your other casing.
6. sew the casings on with seams a scant 1/8” from the top and bottom edge. reinforce the edges by doing a little back-and-forth sewing at each end of each seam, because they get pulled on a lot as you open and close your bag, and need to be secure. leave the short ends open (you will thread your drawstrings though them later).


assembling the bag:
1. take your body piece of fabric B, and turn it into a tube by folding it in half, right sides together, and sewing a seam down the edge that is not equal to the circumference of your circle. press the seam.


2. with the right side of your circle facing up, and your tube-like body piece of fabric still inside out, pin the circle to the bottom edge of the tube you’ve just created. sew this on with a ¼” seam, then turn it right-side-out. this is now the lining of your bag.
3. go through the previous two steps with your circle and body pieces of fabric A to create the outside of your bag, only leave this one inside out.
4. place your right-side-out lining inside your inside-out outer bag, lining up the two side seams neatly. pin around the top, then sew it up with a ¼” seam, leaving a 1” hole for turning.


5. turn your bag right-side-in through the turning hole, press the top seam carefully, then top stitch around the top seam, being careful to catch the folds of your turning hole so that it closes neatly.
6. using a safety pin or similar, thread your ribbon or cord through the casings. thread one piece through each casing so that it loops around the bag with several inches to spare at each end, then tie the ends in a knot.


7. thread the other piece through in the same way, only in the opposite direction. When you pull on the knotted ends, the bag should draw closed.


now all that remains is to fill your bag with secret treasures and find a good hidey-hole for it! i hope you love this pattern, and that you’ll leave a comment, or drop back with photos if you make it.

Sunday, 1 November 2009

garlands

there are a lot of crafters making really beautiful fabric garlands these days. some are incredibly elaborate, with hand embroidery, lace, and buttons incorporated, others are more simple and understated. i really like them because of the fact that they’re an idea that an be interpreted and adapted in so many ways.
i decided a while ago that i would like to make some for our family, that could become beloved and familiar features of all family celebrations. when i saw sweet jessie’s version, a simple scalloped garland, i was inspired to make mine in a similar vein.
last night i collected some fabrics together out of my stash (i decided to start with yellow because it’s such a cheerful, festive colour, but i think my next one will be pink), and today i cut and sewed like the wind, and finished a lovely long garland.


i think i will bring it along to my oma’s birthday party next week to add a little crafty touch to the decorations.


now to go and choose some pink fabrics…

Friday, 30 October 2009

a quilt for my oma

my oma is about to turn 80, so i am making her a quilt.


she is a very non-fussy, dutch lady, so pink and lilac and frills were never going to do for her. it needed to be simple, and involve the colour blue.


when i’m making quilts i get very tired of counting the blocks over and over again, and never being 100% certain in my mind that i have the right number. my solution to this is to write a number of each block (in this case it was 1 - 40), and as i cut the pieces for that block, tear the number off the page i’ve written it on, and lay it on the pieces. simple, and very effective!


i’m making progress, and hoping very much that i get it finished in time to give to her on the day!

Saturday, 5 September 2009

an unusual project...

my honey has recently taken up the ukelele. she has a red one and his name is eustace. she plays him all the time, and it’s basically the cutest thing i have ever seen:


he had a soft case that came with him from the shop, but it was kind of boring, and i have been promising for weeks now to make him a new one, with a little more personality. last weekend i came good on that promise:


it was a lot of fun to make this from scratch without a pattern - it definitely boosted my confidence in “freestyle” sewing (for want of a better term!).


it even has a little pocket for her pitch pipe, though i still have to sew a button on there so it doesn’t escape.

sajee says that eustace is now he best dressed ukelele in the land - hee hee!

Monday, 27 July 2009

tutorial: coasters in an hour

we have a new coffee table in our house. this afternoon, as i was rambling to my partner about being at a loose end, she suggested i make some coasters to go on it.


so i did.


it was so easy - i just made it up as i went along.

if you want to make some of your own, here are the steps:


1. choose two fabrics that you are fond of, and that you think look good together. designate one as fabric A and one as fabric B (it doesn’t matter which is which).
2. from fabric A cut 6 squares that are 3.75″ by 3.75″.
3. do the same with fabric B.
4. then cut 6 squares, also 3.75″ by 3.75″, of iron on pellon (i used vilene h 640 - a little squishy, but not too fat for your drinks to sit on with stability!) and iron a piece to the wrong side of each piece of fabric B.
5. place a piece of fabric A on top of fabric B, right sides together (so you have the pelloned side of fabric B, and the wrong side of fabric A facing out), and pin. do this with all six paired pieces.
6. sew around the edges of each little fabric sandwich, with a scant 0.25″ seam allowance, making sure you leave a 1.5″ gap for turning.
7. trim the corners, then turn your coasters the right way out. make sure you use a knitting needle, pencil, or similar, to gently work the corners all the way out.
8. iron each coaster, and as you do so, carefully fold the seams of your turning hole in so that they form a neat edge. at this point you could slipstitch the gap closed, but i am far too lazy for that, and just make sure to catch the edges and secure the hole in the next step.
9. sew a top stitch around the outside of each coaster, leaving approx 0.25″ between your stitches and the edge.
10. press once more, then use and enjoy!


there are two things i like about this - the first is they would make great presents for friends and family, and the second is that there’s a seemingly endless range of ways you could personalise and embellish them. i think my next set will have lace around the edges - or maybe ric rac!

i hope you get a chance to make a set of your own. let me know in a comment if you do!

Sunday, 14 June 2009

so, so scrappy


i am working on a big quilting project, and i am really excited about it!


i am using up all my scraps...


when i am finished, there will be 900 of those little squares, all pieced together into the scrappiest quilt in the whole wide world. 

Tuesday, 12 May 2009

a little gift

one of my friends had a birthday this week. she’s a crafty chick, who likes apples and red. for christmas i used the minny muu “wee apples” fabric


…to make her a little bag, and as i had a bit left i thought i would use it to make her a brooch for her birthday.
i was inspired by this tutorial by allison of cluck, cluck, sew, and it was super easy. want to see? here it is:


i particularly like the way the edges of the fabric are left ‘raw’ so that they will fray a little with use and get a shabby look.

so, next time you have some fabric that is just right for a certain friend and you’re not sure how to use it, i can highly recommend that tutorial as an easy and fun solution!