Friday, 6 December 2013

project life - a learning curve!

i'm having so much fun with project life.
i love messing about with paper, and photos, and washi tape.
i love that it's the kind of craft that you can do in short bursts, and don't have to spend large chunks of time paying close attention to - that makes it so much more manageable for me.

it's been a few weeks, so i've got several layouts to show you, and i will say that there are things i love about each of them, but lost of things that i'm not thrilled with. that's the best thing about a new craft - everything you learn about colour, texture, pattern, and design through trial, error and play.

so, here are my latest layouts, with a bit of reflection on the success each one.

october 21 - 27, 2013
love: the photo of arty and his oddmother, the pink/black/white colour combination, incorporating the butterflies that arty and i painted together.
don't love: the black and white stripes are too stark, i used a pen with too fine a tip and the text is too light.


october 28 - november 3, 2013
love: the way the colours complement each other, the way the game cards my friend jerry made me fit perfectly in a 3x4 pocket, the feather accent from pretty little studio
don't love: the sticker in the bottom right corner.


november 4 - 10
love: the way the colours work together
don't love: pretty much everything else... it's just a little bit too plain, or something? i don't know.


november 11 - 17
love: the bright colours, the inclusion of the ticket from the theatre, the photos from the farm, the pocket full of all my birthday cards.
don't love: the title card (i'm planning to redo it)

Monday, 21 October 2013

project life: october 7 - 13

i kind of love this spread.
with regards to colour, it's pretty simple, and i haven't embellished it too much, but i painted all the leaf details with watercolour, and i'm really pleased with how they turned out.


i also love the two photos of arty and his oma that feature on he right page. they capture the love between the two of them so well, and they make me happy every time i look at them.

Tuesday, 15 October 2013

tiny matryoshka

whipped this little sweetie up on the weekend. she only took an hour or two, and i think she's very cute:


the pattern is from sewn studio, though their version is made with washi 'X'es on a wall - brilliant idea!

Friday, 11 October 2013

little washi notebooks

i know there's nothing new about this idea, but that doesn't mean it's not a nice thing to do :)


little washi notebooks


what you'll need:


what to do:

  • you're literally just sticking the washi on your notebooks in any way that looks nice to you.
  • i cut a little V into the end of some of the pieces of washi, just to add interest, but otherwise i kept them quite simple - the washi i used was quite detailed, so i didn't think it needed much elaboration.


here are some other creative takes on this idea:
- hello hue
- refinery 29
- alice and lois
- two purple couches 


i think these make lovely gifts for people who like to write and draw, so i'll be making some more for my creative friends in the future.


Thursday, 10 October 2013

like a hole in the head

if you know me, you'll know that i spend all my spare time crafting. and with a toddler in the house, the concept of spare time is pretty laughable most days. i have about three different quilting projects on the go at the moment (okay, four... FINE! seven! i have seven! are you happy now?), and my embroidery needle is never idle for long. i also draw and paint.

so i think it's safe to say that i need a new craft like a hole in the head.

but...

i really like paper. and i really like recording stories.
whenever we go travelling, i make travel journals with descriptions of our adventures, and stick in everything from postcards to bus tickets, to receipts from places that we shop. when i read over them, years after the fact, i get to revisit little details of the places we went that i would never have remembered otherwise.

a page from my travel journal, paris 2008

and here's the thing: i know that there are going to be hundreds of little details of arty's babyhood and childhood that i am going to want to revisit in future. the funny things he says, the clever ideas he has, and all the day-to-day stuff we do together are what make this time so precious.

arty's first potato print, ready for the album

so i have caved. and i have started project life.

my friends talia and ren have both been doing beautiful things with their own project life albums, and seeing their work was what finally tipped the balance for me. they showed me that scrapbooking doesn't have to be fussy or twee. it can be a colourful little love letter from the present to the future. with washi tape.

as a completionist, the idea of starting at a random point in the year was a little bit distressing, but i made myself let that go, and just got started.
to compensate, i have decided to do a single page for every month of arty's life up until the proper weekly scrapbooking begins. luckily, i had letters to arthur, facebook updates, and a well stocked instagram feed to help me fill in all the details. the process of going back over just those 19 months of his life confirmed that this is definitely something i need to do.

here are the weekly double page spreads i've done so far:

september 9 to15, 2013
featuring: some of arty's pinting, a reipe that sj baked for the royal show, a photo of the 5 leaf clover i found in the backyard, a hand-embroidered sunshine card, and a partially successful attempt at including fabric hexagons.

september 16 to 22, 2013
featuring: some silly little drawings by me, a repurposed greeting card, three kinds of washi tape, and a story about arty wearing a flower in his hair.

september 23 to 29, 2013
featuring: sj's grand final ticket, hand painted title and filler cards, a bumper sticker from sj's choir concert, and a story about arty being unwell.

30 september to 6 october, 2013
featuring: tickets from our trip to the royal show, arty's first potato print, a drawing of my d&d character, and a story about arty's developing language skills.


so expect to see some ramblings about this project here, along with talk of embroidery, quilting, and other sewing projects. if you're doing project life too, set me up with a link to your stuff - i'd love to see!

Thursday, 26 September 2013

right of reply

i don't like to be negative about craft. it's something that brings me joy, and my many crafty pursuits are always calming, restorative and fulfilling to me. they're part of what makes me happiest in life.

similarly, i have always found communities of crafters to be positive, encouraging, and uplifting collections of people who inspire and support each other. most handcrafts are things you need to learn by being apprenticed to others, and whether they're online communities or real life sewing circles, i've learned almost everything i know from people who have been kind enough to teach me.

disappointingly, these groups sometimes contain people who are unkind, and work against the spirit of respect and camaraderie that i always take as given when i'm interacting with other crafters.

recently i organised a swap on craftster.org. i've participated in a lot of swaps in the past, and made a heap of friends through exchanging handmade goodies.
the brief for the swap was to make a 4 inch embroidery hoop for your partner, and as an example i used a photo of a 4 inch embroidery i drew, designed, and stitched for my best friend back in 2011.

it looks like this:
it was painstakingly designed, and went through several drafts to ensure it was perfect before being stitched. i was really proud of it, and happy to give it to my friend at the time. it seemed a very good example of the kind of thing i was hoping we could all achieve in this swap.

in the original swap thread, a user claimed that the image i had used was actually her own. i assumed it was an honest mistake (though i have never mistaken someone else's work for my own in the past, and it seemed a little odd to me at the time):

she didn't reply. i figured she'd realised her mistake and there was no more to say about it.

some weeks later, in a related thread (the gallery of completed projects produced in the swap), she tried it again, only this time saying my image (the exact same one) wasn't actually hers but just looked a lot like hers. the clear implication was that i had copied it. her comment is underlined in purple in the image below.


i posted the project on craftster when i completed it in january 2011. you can see it here. the date is clearly printed at the top.

i also posted photos to flickr. they're also dated. see them here, here, and here.

the crafter in question posted photos of her version of my piece to her blog in a post made in january 2013 in which she displayed her crafts from the past year.


and here is her photo of her version:

my work clearly preexists hers, and as you can see, the image is reversed, showing that it was printed, traced, and stitched directly from my original.

now, i honestly don't mind people sharing crafting ideas. it happens all the time.
and it's not like this person has taken my design and tried to profit from it, so the harm done isn't drastic.

what i take exception to is the implication that i have tried to pass someone else's work off as my own and lied about it. as someone who designs and sells patterns i am utterly scrupulous about this, and having my integrity questioned is not something i'm willing to stand for.

i'm not going to have a debate on craftster, because it's not in the spirit of the community, but i'm really hurt and frustrated by this, so i've had my say here, in my own online space, so i can feel that i've at least got it off my chest.

(thank you to siobhan and renae for helping me dig up my old links. i love you both x)

Saturday, 3 August 2013

pattern: i'm no lady (and a special discount code!)

it's been a long time coming, but i'm excited to finally present a brand new penelope waits pattern!


i've been doing a lot of gardening in this last year, and my love of lady bugs has flourished - they're just so good for the garden. i feel happy every time i see one because i know they're a sign that my garden is healthy. this pattern has been in honour of my favourite garden friends - and it wouldn't be right if it didn't come with the kind of dorky pun you've all come to expect from me!

this is an almost ridiculously easy piece to stitch. it's made up of just two colours, and it's small enough that when worked on 14 count aida, you can frame it, like i have done, in a 4" hoop. if you've been wanting to give cross stitch a try, this is the pattern to begin with.


you can purchase this pattern as an instant pdf download from my etsy store, and in celebration of the new member of the pattern family, i'm offering a 15% discount on all patterns in the shop until the end of august. just enter the code: newlady when you make any purchase

i really hope you like this wee thing. i'm pretty fond of it myself.

Tuesday, 14 May 2013

tutorial: scrappy wall quilt


some months ago, i participated in a scrap swap with some lovely crafty people on instagram. i received some beautiful little pieces of fabric, that might otherwise have ended up unused, and decided to team them with bits from my own vast scrap collection to make a wall quilt for our bedroom.
it's a pretty straightforward project, so i thought i'd share a quick tutorial here...


scrappy wall quilt

what you'll need

81 white or cream fabric scraps, cut into 1.5 inch squares
402 coloured fabric scraps, cut into 1.5 inch squares
30 x 30 inch piece of backing fabric
30 x 30 inch piece of quilt batting (i used an offcut from another quilting project)
1 skein of cream coloured stranded embroidery floss
1.2m bias binding in a colour or print that complements your scrap collection
sharp scissors
a sewing machine with bobbin and cotton (i aways use gutermann thread, and find cream is the best colour for scrappy projects)
quilting safety pins
a quilting or embroidery needle


what to do

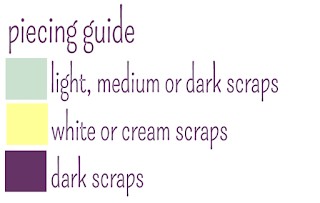
  • using your sewing machine, and working with 1/4 inch seams, piece your blocks according to the diagrams below:


  • sew blocks into rows as shown in the following diagram, then sew the rows together to complete your quilt top


  • lay your backing fabric right side down on a flat surface (the floor, or kitchen bench is ideal), smoothing it out so that it is perfectly flat
  • place your quilt batting on top, smoothing again as you go
  • finally, place your pieced quilt top, right side up, on the batting.
  • working from the middle towards the edges, carefully pin these three layers together with your quilting safety pins (i usually put roughly one pin per 3 inches square. you can't really over-pin, so if in doubt, err on the side of caution.)
  • thread your needle with two strands of floss, and stitch a small X at the point of each square on your quilt as pictured below. 
top: begin to make your X, leaving a 1 inch tail at the back for tying off
bottom: complete your X, and tie off at the back with a strong double knot. then trim the ends to approx 1/4 inch long

  • remove saftey pins as each section is quilted.
  • using a very sharp pair of scissors, trim the backing and batting of your quilt so they are even with the edge of the top
  • now bind your quilt using your preferred method (if you have not bound a quilt before, this tutorial is a good one to start with, otherwise have a look for on youtube where there are heaps of good demonstrations to be found).
  • your quilt is now complete, and ready to hang.

further notes
  1. where scrap size permitted, i tried to "fussy cut" my fabric squares, to pick out interesting or pretty motifs such as the fern, horse, and squirrel below.
  2. the reason i chose this, frankly MUCH more time consuming method of quilting, is because of the very small pieces of fabric. quilting over the individual squares would have obscured all the tiny details to be found in the prints, which to my mind would have defeated the purpose of the quilt. 
  3. if you'd like to see what other people have made with their scraps, have a look at the #inchbyinchquilt hashtag on instagram - there are some beauties there!

i hope you have a go at this project. it's lovely to revisit old favourite fabrics, and work with them all over again, and the finished piece looks very cosy and, well... homey on the wall.

do drop me a comment or an email if you make your own - i'd very much love to see it!